Old Fashioned Blueberry Crumb Cake


This cake is wonderfully light, moist, delicious and old fashioned. The bottom cake layer is filled with bursting blueberries and the top is layered with a crunchy streusel topping. It’s perfect for brunch or served as a decadent dessert…just like how they use to serve it back in the day!

Old Fashioned Blueberry Crumb Cake Recipe

You'll need:


For the cake:
  • 6 tablespoons unsalted butter, at room temperature (3/4 stick)
  • 3/4 cup sugar
  • 2 extra-large eggs, at room temperature
  • 1 teaspoon pure vanilla extract
  • 1/2 teaspoon grated lemon zest
  • 2/3 cup sour cream
  • 1 1/4 cups all-purpose flour
  • 1 teaspoon baking powder
  • 1/4 teaspoon baking soda
  • 1/2 teaspoon kosher salt
  • 1 cup fresh blueberries
For the streusel:
  • 1/4 cup granulated sugar
  • 1/3 cup light brown sugar, lightly packed
  • 1 teaspoon ground cinnamon
  • 1/8 teaspoon ground nutmeg
  • 1/4 pound (1 stick) unsalted butter, melted
  • 1 1/3 cups all-purpose flour
Directions:

Preheat the oven to 350 degrees F. Butter and flour a 9-inch round baking pan.

For the streusel:
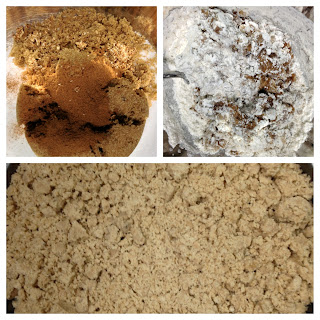
Combine the granulated sugar, brown sugar, cinnamon, and nutmeg in a bowl. Stir in the melted butter and then the flour. Mix well and set aside.

 
For the cake:

Cream the butter and sugar in the bowl of an electric mixer fitted with the paddle attachment on high speed for 4 to 5 minutes, until light. Reduce the speed to low and add the eggs 1 at a time, then add the vanilla, lemon zest, and sour cream. In a separate bowl, sift together the flour, baking powder, baking soda, and salt. With the mixer on low speed, add the flour mixture to the batter until just combined.


Fold in the blueberries and stir with a spatula to be sure the batter is completely mixed.
Spoon the batter into the prepared pan and spread it out with a knife. With your fingers, crumble the topping evenly over the batter.


 Bake for 40 to 50 minutes, until a cake tester comes out clean. Cool completely and serve.


Popular posts from this blog

DIY Mr. Potato Head Busy Board

Keep the little ones busy while they learn about their 5 senses. This Mr. Potato Head busy board is simply made with felt. Remember, felt naturally sticks to itself so the fun and possibilities are endless! Stuff You'll Need: - felt in various colors - scissors - hot glue gun  Directions: 1. Cut a large potato-shaped body out of light brown felt. 2. Make your eyes, ears, nose, mouth and arms. You can make additional fun accessories like a hat, shoes, bag, etc. Get creative! Here's Mrs. Potato Head! Emma and her masterpiece!

DIY Felt Ice Cream Truck Quiet Board

I'm constantly finding new ways to entertain my little tot while I try to get work done. This adorable felt ice cream truck quiet board will keep the little ones busy, plus they can work on their counting skills, colors and building skills. And remember, felt naturally sticks to itself so the fun never ends! Stuff You'll Need: - a 20" x 15" foam board - scissors - box cutter - hot glue glue - white felt - felt in assorted colors for your truck accessories and ice cream treats Directions One: Two: Three: Cut out an ice cream truck canopy, window, truck divider & wheels out of felt (in your choice of colors). Four: Glue all the above onto your felt-covered board using your hot glue gun. Five: Create your ice cream treats! This is the fun part and the possibilities are endless. Here's Emma's "Menu" of ice cream treats I've made: happy creating! xo

Au revoir! Catch me on Instagram

I initially started this blog in 2010 to chronicle  my baking adventures. In 2013 I became a mother and this space shifted to sharing my DIYs and inspiration for creative living. Since then, I've been fortunate to work with multiple companies producing creative editorial content. As I look back at this blog, I'm reminded of how your passions can actually unfold into a career. And if you're really patient and willing to put in the all the work, dream jobs do come true. So it is here where I say au revoir to my beloved blog, aka my creative journal. You can still find me on @craftedbyjen .  xoxo, Jen